Why Your YouTube Videos Sound Amateur (And It's Not Your Microphone)


TL;DR
- ✓ Poor audio is usually caused by room echoes rather than expensive hardware.
- ✓ Use soft materials to dampen sound reflections and stop comb filtering issues.
- ✓ Create professional depth by layering voiceovers with ambient beds and sound effects.
- ✓ Prioritize room treatment over buying high-end microphones for better sound quality.
Poor YouTube audio quality usually comes from the room, the distance to the mic and the mix, not the microphone. Echo from bare walls, uneven volume, music that buries the voice and no loudness check are the usual causes. Fix the room, record closer, process every voice the same way and export at YouTube's recommended settings.
Last updated: October 6, 2026. Upload settings were checked against YouTube Help that day.
This guide is for creators who already own a decent mic but still get a thin, echoey or uneven sound. It works the same whether you record your own voice or use an AI voiceover.
Key Takeaways
- The room matters more than the mic. Hard walls and floors bounce your voice back into the mic and make it sound hollow.
- Get closer. Recording a short distance from the mic raises your voice above the room sound.
- Use one fixed processing chain: noise reduction, high-pass filter, EQ, compression and a limiter, in that order.
- Measure loudness in LUFS, the unit defined by ITU-R BS.1770, and keep every video at the same level.
- Export at YouTube's recommended audio settings: AAC-LC or Opus, 48 kHz, stereo at 384 kbps.
On this page: Common causes · The room · Mic distance · Processing chain · Loudness · Music and effects · Export settings · AI voiceovers · Checklist · FAQ
Why does your YouTube audio sound amateur?
Most amateur-sounding audio has one of 5 causes. Match what you hear to the likely cause, then jump to the fix.
| What you hear | Likely cause | Fix |
|---|---|---|
| Hollow, echoey, "in a bathroom" | Sound bouncing off hard walls, floor and ceiling | Soften the room, record closer |
| Hiss or hum under the voice | Background noise, fans, fridge, electrical hum | Turn off noise sources, then light noise reduction |
| Muddy or boomy voice | Too much low end, often from the room | High-pass filter and a small EQ cut |
| Volume jumps up and down | No compression, inconsistent distance | Compression, steady mic position |
| Music drowns the voice | Music mixed too loud | Lower the music and duck it under speech |
Fix the room before you buy new gear
A microphone records everything in the room, not just your voice. In a room with bare walls and hard floors, your voice bounces off each surface and reaches the mic a moment later. Those late copies blur your voice and make it sound thin and hollow.
A more expensive mic records that echo just as clearly. Soft materials absorb it instead:
- Hang heavy blankets or curtains behind and beside where you sit.
- Add a rug if the floor is hard.
- Record in a smaller, furnished room, such as a bedroom with a bed and a wardrobe full of clothes.
- Face into the soft side of the room, so your voice travels into absorbent material first.
Get closer to the microphone
Distance changes the ratio of voice to room. The closer you are, the louder your voice is compared with the echo and noise around you.
Try recording about a hand's width from the mic, with a pop filter if your "p" and "b" sounds pop. Then keep the same position for the whole session. Moving back and forth is one of the most common causes of uneven volume.
The processing chain that fixes most YouTube audio quality problems
Process every voiceover with the same chain, in the same order. The settings below are common starting points, not fixed rules; adjust them by ear.
- Noise reduction. Remove steady hiss or hum. Use it lightly, because heavy settings make the voice sound watery.
- High-pass filter. Cut the low rumble below the voice, starting around 80 Hz for most voices.
- EQ. If the voice sounds muddy, try a small cut somewhere between 200 and 400 Hz.
- Compression. Even out loud and quiet words, so viewers don't reach for the volume.
- De-esser. Soften harsh "s" sounds if compression made them stand out.
- Limiter. Set a ceiling so peaks never clip.
Save the chain as a preset in your editor. Using the same chain on every video keeps your channel sounding consistent.
How loud should YouTube audio be?
Measure loudness in LUFS (loudness units relative to full scale). The method comes from ITU-R BS.1770, the international standard for measuring programme loudness and true-peak level. Most editors and free meters show it.
YouTube's upload guidance doesn't state a loudness target. Our suggestion: pick one target for your channel, such as around −14 LUFS integrated, and keep true peaks below about −1 dBTP. The exact number matters less than hitting the same level on every video.
Check loudness at the end of the mix, after the limiter. If one video sounds much quieter than the last, viewers notice.
How to mix music and sound effects under your voice
Think in layers, with the voice on top:
- Voice. The main layer. Everything else supports it.
- Room tone or ambience. A quiet, steady bed that stops cuts from sounding dead.
- Sound effects. Short, purposeful sounds, such as a click on a screen change.
- Music. Set the mood, but stay clearly below the voice.
Use ducking, also called sidechain compression, to lower the music automatically when you speak. If your editor doesn't have it, lower the music by hand under each spoken line.
Which audio settings does YouTube recommend for uploads?
YouTube processes every upload for playback, so give it a clean, high-quality source. These are YouTube's recommended audio settings for uploads:
| Setting | YouTube's recommendation |
|---|---|
| Container | MP4, with the moov atom at the front of the file (Fast Start) |
| Audio codec | AAC-LC, Opus or Eclipsa Audio |
| Channels | Stereo, or stereo + 5.1 |
| Sample rate | 48 kHz |
| Bitrate | 128 kbps mono, 384 kbps stereo, 512 kbps 5.1 |
Keep your project at 48 kHz from the start, so nothing needs converting at export.
How to make AI voiceovers sound less amateur
AI voices arrive without room echo or mouth clicks, but they can still sound flat or rushed. The fixes are in the script and the settings:
- Write for the ear. Short sentences, one idea each, and commas where you'd pause.
- Slow down slightly. A small speed reduction often sounds more natural than the default.
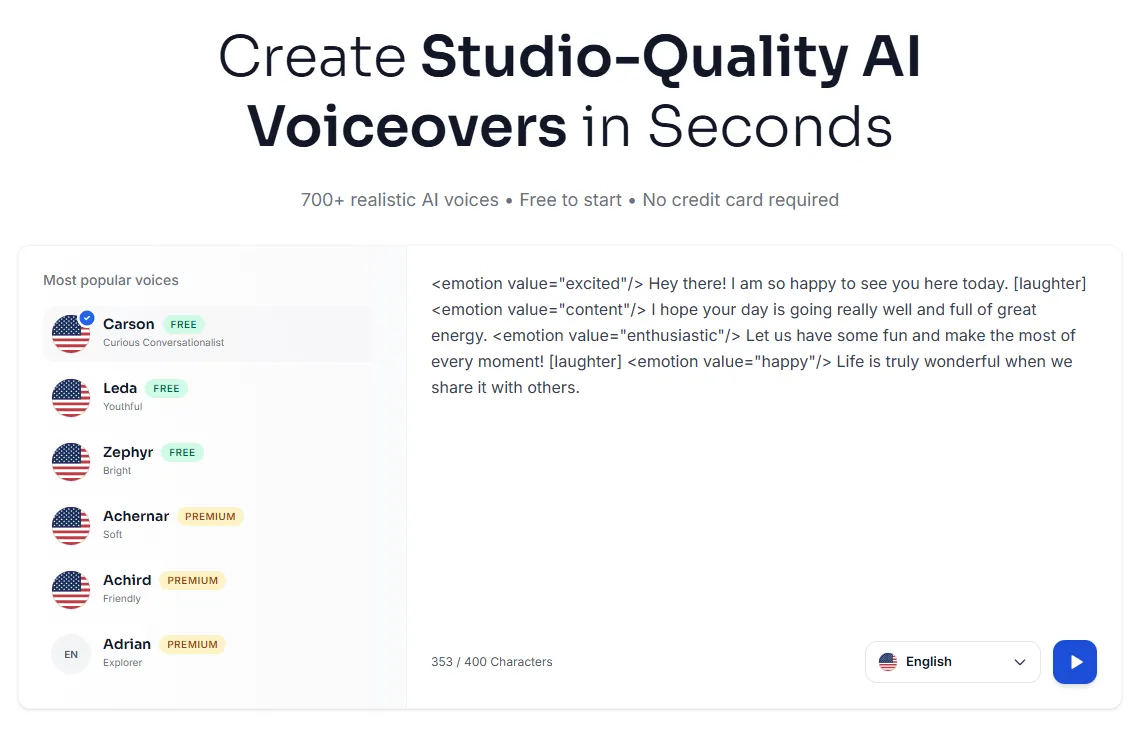
- Add emotion where the script needs it. In Kveeky, tags such as
<emotion value="excited"/>or[laughter]change how a line is read. - Export WAV for editing. Kveeky exports MP3 and WAV; WAV gives your processing chain the cleanest source.
- Still mix it. Run the AI voice through the same EQ, compression and loudness steps as a recorded voice.
For more on delivery, our guide to making an AI voiceover sound less robotic covers pacing and emphasis. To pick a tool first, see our comparison of free AI voiceover tools for YouTube creators.
A 30-second audio check before you publish
Listen to the first 30 seconds on headphones, then on a phone speaker. Ask:
- Is there hiss or hum under the voice? Apply light noise reduction.
- Does the voice sound hollow? Fix the room next time; for now, try a little EQ.
- Do any words jump out louder? Add or adjust compression.
- Can you hear every word over the music? Lower or duck the music.
- Does the loudness match your last video? Check the LUFS reading.
The first 30 seconds matter for retention as well. YouTube Studio's key moments report shows the share of viewers still watching after 30 seconds, which our AI voice watch time test plan uses as its main metric.
Frequently asked questions
Why does my voice sound hollow even with a good microphone?
Your mic is recording sound that bounces off hard walls, floors and ceilings. Move closer to the mic and add soft materials, such as blankets or curtains, around where you record.
How do I stop music from drowning out my voiceover?
Lower the music well below the voice, then use ducking, also called sidechain compression, to dip the music automatically when you speak. If your editor lacks it, lower the music by hand under each line.
What audio settings should I use when uploading to YouTube?
YouTube recommends AAC-LC or Opus audio at 48 kHz, in stereo at 384 kbps, inside an MP4 file. Keep your editing project at 48 kHz from the start.
How loud should my YouTube video be?
YouTube's upload guidance doesn't state a loudness target. Measure in LUFS, pick one level for your channel, such as around −14 LUFS integrated, and keep every video at that level.
Can AI voiceovers sound professional on YouTube?
Yes, if you write for the ear, adjust speed and emotion, and mix the AI voice like any recording. Export WAV so your EQ, compression and loudness steps start from a clean file.
How we checked this guide
This guide is written by Deepak Gupta for the Kveeky team. Disclosure: Kveeky makes an AI voice generator.
- Upload audio settings come from YouTube Help, recommended upload encoding settings, retrieved October 6, 2026.
- The LUFS measurement method comes from Recommendation ITU-R BS.1770, retrieved October 6, 2026.
- The 30-second intro metric comes from YouTube Help on key moments for audience retention, retrieved October 6, 2026.
- EQ frequencies and the −14 LUFS level are our suggested starting points, not standards. No Kveeky usage data is used in this guide.
Ready to fix your next upload? Save the 6-step chain above as a preset, run the 30-second check, and if you narrate with AI, start from our guide to AI voiceovers for YouTube videos. For more creator workflows, see our hub on AI voiceover for video production.